← 15. A near-free deployment · Contents · Next → 17. The all-in-one reader
16. The lab suitcase
A hardware build, not shipped software. What follows is a workbench tool for testing a controller against real readers and real doors. It does not belong among 3. Architecture's seven components, and nothing in this chapter changes what a controller does.
A controller's reader bus has exactly two shapes.
SIMULATION_LISTEN accepts one line of text over TCP, 1:BDG-0001, and is what every test suite and every laptop talks to (4. A decision). It opens beside the real wires, never instead of them.
OSDP accepts real frames over an RS-485 line, and is what every controller that actually ships runs. It opens on its own once a door or a reader has a bus address, and the header opens beside it for readers wired there.
Almost nothing exercises the second shape day to day, because a multi-drop serial bus with addressable peripherals rarely sits on the same desk as the code that talks to it.
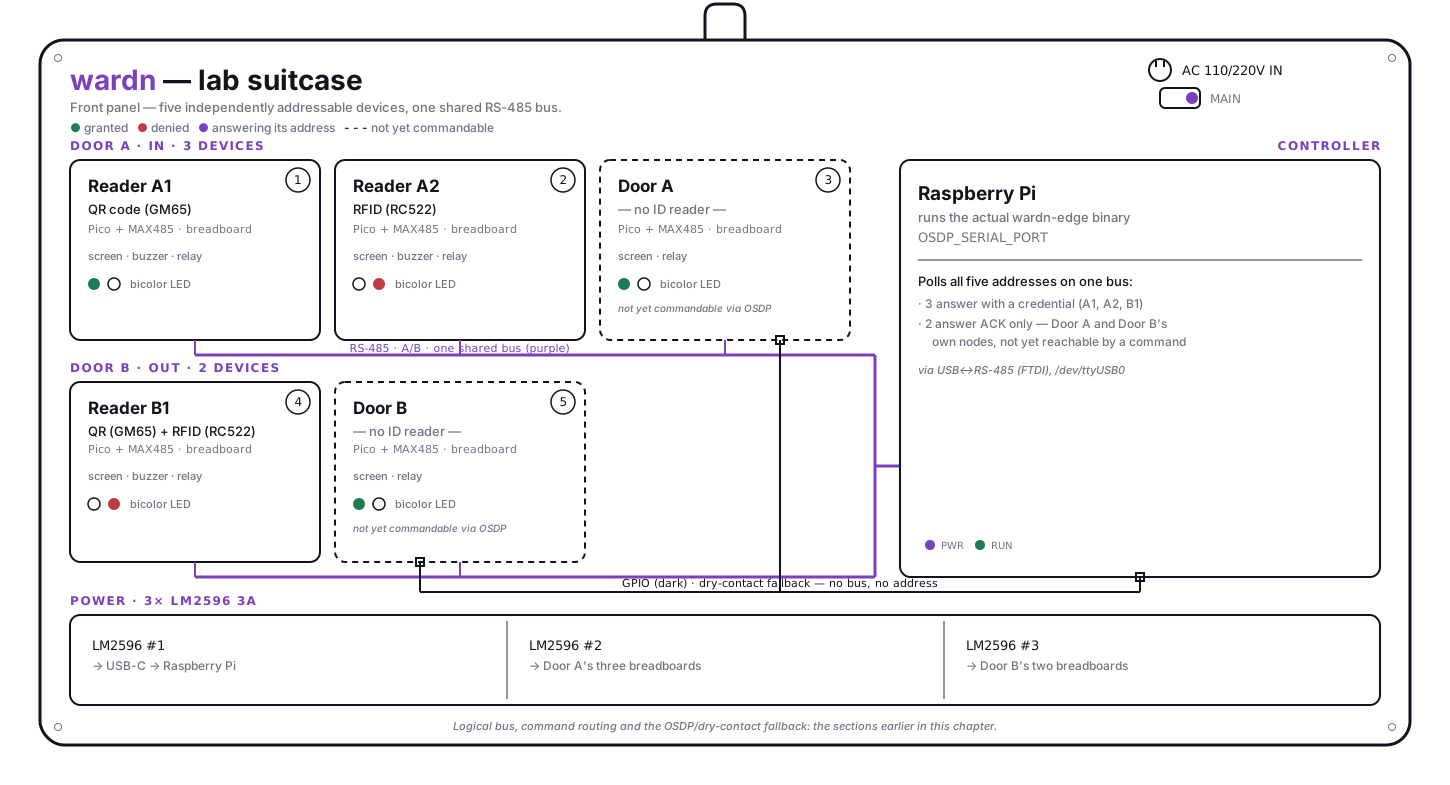
The lab suitcase closes that gap: a hard case with a real RS-485 bus, two doors wired the way a real site wires them, and a node dedicated to every door and every reader, small enough to carry to a desk and put a controller in front of.
The finished panel
Why one node per door and per reader
Everything else in this chapter follows from one decision: the bench gives every entity wardn's own data model already names its own node, its own relay, its own feedback (screen, buzzer, bicolor LED), rather than sharing a relay or an indicator across several of them.
Why this way? 5. Access rights models a door and the readers watching it as separate things:
Door "1" --> "*" IdentificationDevice : is watched by. A command server-side can today only be addressed to a door as a whole (force_open,set_door_mode); nothing in the command set reaches a single reader.Wiring the bench so a door's actuation is physically distinguishable from a reader's own feedback is what turns "does a command land on the right physical thing" into a question the bench can actually answer, instead of one only the source could.
The two doors
Door A (entry, direction=IN) carries two separate readers, each on its own node:
| Node | Identity technology | Feedback |
|---|---|---|
| Reader A1 | QR code | Screen, buzzer, relay, bicolor LED |
| Reader A2 | RFID | Screen, buzzer, relay, bicolor LED |
| Door A | — (door node itself) | Screen, bicolor LED, relay |
Door B (exit, direction=OUT) carries a single reader that speaks both technologies, which is a reader format branching on the frame's own prefix and emitting a different identifier type per case:
| Node | Identity technology | Feedback |
|---|---|---|
| Reader B1 | QR code and RFID, one physical unit | Screen, buzzer, relay, bicolor LED |
| Door B | — (door node itself) | Screen, bicolor LED, relay |
That is the deliberate asymmetry: door A proves two independent readers resolving to the same door, door B proves one reader accepting more than one credential family. Between them, both shapes 5. Access rights has to support are on the bench at once.
Five nodes in total, each its own breadboard and its own Raspberry Pi Pico: three under door A (two readers, one door), two under door B (one reader, one door). None of them run wardn-edge themselves.
Each answers bus polls at its own address, the same discipline 8. The dashboard describes for an OSDP address: meaningful "only on a multi-drop bus, where several readers share one line and the controller needs to know which one is answering." A single Raspberry Pi runs the actual wardn-edge binary and owns the bus.
Both node kinds are what the firmware drives today. A reader node answers OSDP polls with a credential, which is what
wiring: bus:Nmeans for a reader. A door node, addressable on the same bus and opened by anosdp_OUTcommand rather than by the controller's own header, is whatwiring: bus:Nmeans for a door — the controller sends the command instead of closing a contact, and neither the decision nor the log can tell the difference.Building the door nodes this way is what made that gap visible on a bench instead of leaving it an assumption. It is closed.
The relay is a signal, not a strike
Every relay on this bench, on a reader node or a door node, drives a click and nothing load-bearing: there is no physical strike to release, no latch to hold. Its job is to be heard and seen the instant a decision reaches that specific node, so a command aimed at door A's own node and a command aimed at reader A2 produce two audibly different clacks, from two different places on the panel. That is what lets the bench prove targeting rather than only proving actuation.
OSDP, and the fallback that still has to work
The bench's whole point is exercising OSDP against real addressable hardware.
But a door does not stop being a door the day its OSDP node fails, or on a site cheap enough that it never had one: the dry-contact relay wired straight to a controller's GPIO (3. Architecture) has to keep working on its own, with no bus, no address, and no node between the controller and the strike. Both paths belong on the bench:
- OSDP path. Door and reader nodes, addressed on the shared bus, reachable by whatever the command set ends up supporting per address.
- Dry-contact path. The Raspberry Pi's own GPIO header, wired straight to door A's and door B's relay, exactly as a door whose wiring reads
relay:Ndoes on a real controller, with no node and no bus address in between. The controller takes those lines offGPIO_CHIPand holds them forrelayPulseMs.
Both paths land on the same two relays. Door A's and door B's relay each has two ways to fire: a command arriving over the bus at that node's own address (the OSDP path, ahead of what the firmware sends today), or a wire run straight back to the Pi's own header (the dry-contact path, exactly what production already does).
The relay does not know or care which one pulled it low. A controller that only ever saw the first path would have never actually proven the second still works.
The bus
flowchart TB
    subgraph BENCH["Lab suitcase"]
        subgraph BUS["One RS-485 line, five addresses"]
            A1["Reader A1 · Pico<br/>QR code<br/>screen, buzzer, relay, LED"]
            A2["Reader A2 · Pico<br/>RFID<br/>screen, buzzer, relay, LED"]
            DA["Door A · Pico<br/>screen, relay, LED"]
            B1["Reader B1 · Pico<br/>QR code + RFID (multi)<br/>screen, buzzer, relay, LED"]
            DB["Door B · Pico<br/>screen, relay, LED"]
        end
        FTDI["USB ↔ RS-485<br/>(FTDI adapter)"]
        PI["Raspberry Pi<br/>runs the actual wardn-edge binary<br/>OSDP on /dev/ttyUSB0"]

        A1 & A2 & DA & B1 & DB ---|"A/B, twisted pair"| FTDI
        FTDI -->|"/dev/ttyUSB0"| PI
        PI -.->|"GPIO, direct — no node, no address"| DA
        PI -.->|"GPIO, direct — no node, no address"| DB
    end
The dashed lines are the second path: the Raspberry Pi's own GPIO header wired straight to door A's and door B's relays, the same pins a door whose wiring reads relay:N uses on a real controller. That wire bypasses each door's own Pico entirely — it does not care that a Pico happens to share the same breadboard.
Why keep it one shared bus instead of one per door? Today's firmware polls one flat list of addresses on one serial port (
OSDP_SERIAL_PORT); it has no concept of "door A's bus" versus "door B's bus." Wiring the bench to match that, five addresses on one line, tests the controller as it actually runs rather than a segmented topology nothing in the field has yet.
Power
Three LM2596 3A buck converters, each doing one job:
| Rail | Feeds | Why separate |
|---|---|---|
| LM2596 #1 | A USB-C adapter powering the Raspberry Pi | The Pi's own supply is not shared with anything that could brown it out under load |
| LM2596 #2 | Door A's three breadboards | Three Picos, three screens, two buzzers and three relay coils is real current — one 3A rail asked to carry all five breadboards at once is the one that browns out first |
| LM2596 #3 | Door B's two breadboards | The remaining current, on its own rail rather than piled onto #2 |
The three converters exist to split amperage across the breadboards, not to wall doors off from each other: five nodes drawing at once, relay coils included, is more than one 3A rail should be asked to carry.
Door A happens to hold three of the five breadboards and door B two, so that is where the split falls, not because a fault on one door must be kept from the other.
21. A DIY power supply builds this part step by step, and measures it.
Bill of materials
| Category | Component | Why this one |
|---|---|---|
| Controller | Raspberry Pi | Hosts the actual controller firmware under test, not a simulation of it |
| Bus adapter | USB ↔ RS-485 (FTDI) | Gives the Pi a real OSDP_SERIAL_PORT, where the local dev stack only ever offers a loopback |
| Node MCU ×5 | Raspberry Pi Pico | One per door, one per reader: small enough to hide behind a panel position, cheap enough to dedicate rather than share |
| Reader hardware | QR code reader ×2 (door A, door B), RFID reader ×2 (door A, door B) | Two families, four units, matching the roster above. No Wiegand hardware on this bench: every reader here talks to its own Pico directly, not through a Wiegand pair |
| Actuation ×5 | Relay module, one per node | The click that proves which node a command reached |
| Feedback ×5 | Screen, bicolor LED (one per node); buzzer (readers only) | Screens and LEDs on doors show door state; buzzers live only on reader nodes, confirming a scan rather than a door's own status |
| Power | 3× LM2596 3A buck converter | See the power table above |
| Prototyping | Breadboard ×5, one per node | Kept separate rather than shared, so a fault or a rewire on one node never touches another |
Building it, condensed
- Panel. Lay out five node positions (three under door A, two under door B) and a corner for the bus adapter and the power rails before drilling anything.
- Power. Feed all three LM2596 modules from a common source. Route LM2596 #1 to the Pi's USB-C input; route #2 across door A's three breadboards and #3 across door B's two. Tie every ground together: the bus and every node's logic need one common reference.
- The bus. Flash each Pico with node firmware for its own address (two reader nodes and one door node for A, one reader node and one door node for B), wire it to its own RS-485 transceiver, and daisy-chain A/B across all five before landing the far end on the FTDI adapter. Confirm each address answers a poll before wiring the next one.
- The readers. QR reader on A1, RFID reader on A2, both a QR and an RFID reader on B1's single node.
- The doors. Door A and door B's own nodes get no identity reader: only a relay, a screen and a bicolor LED, driven by whatever reaches their own address.
Provisioning the rig
The suitcase is registered the same way any controller's wiring is: a controller, its two doors and their readers, through the API or the dashboard (12. Operating). Reader A2, reader B1 and both door entries get osdp_address values; reader A1's QR node does too, so all five sit on the one bus the firmware actually polls.
Validating
- Cold check. Continuity-test every rail against every other, and against ground, before power ever reaches a board.
- Rail check. 5V at each of the three LM2596 outputs, measured, not assumed.
- Functional check, per reader. Present a credential at A1, A2 and B1 in turn and confirm the controller logs a decision at the right OSDP address, with the matching reader's relay, screen and buzzer firing, and no other node reacting.
- Functional check, per door. Trigger a door-level action and confirm only that door's own node reacts, not either of its readers'.
- Fallback check. With a node's OSDP link disconnected, confirm the door still opens over the plain dry-contact relay path, wired straight to the Raspberry Pi's own GPIO.
This is also a place 10. Security's open item on OSDP Secure Channel can honestly be closed: it stays unimplemented today because trusting it "needs an SCBK provisioned per reader and can only be trusted once it has been proved against real hardware." This suitcase is that hardware.
Where this goes next
The Pico is the right MCU for a wired bus node: cheap, small, and it has no business talking to anything but its own address on its own line.
The day a scenario needs a credential presented over Bluetooth Low Energy rather than read off a badge or a plate, the node behind that reader stops being a Pico and becomes an ESP32, which carries a BLE radio on the same board. Nothing about the bus, the addressing, or the rest of the panel changes: one node's identity technology swaps, the way a reader is reassigned a different format without touching any other node on the line.
The suitcase proves a controller against real readers and real doors, one desk at a time. Wire enough of them and the wiring itself becomes the argument for the next shape.
Next → 17. The all-in-one reader